expertsask994@gmail.com
My Account
  • Home
  • Blog
  • eBooks
  • SAP FICO Course
  • About
  • Contact Us
  • My account

No products in the cart.

  • Home
  • Blog
  • eBooks
  • SAP FICO Course
  • About
  • Contact Us
  • My account

No products in the cart.

  • Home
  • Blog
  • eBooks
  • SAP FICO Course
  • About
  • Contact Us
  • My account

No products in the cart.

  • Home
  • Blog
  • eBooks
  • SAP FICO Course
  • About
  • Contact Us
  • My account
FICO
Home FICO Page 3

Category: FICO

FICO

Everything about OB52 authorization group

I am sure many of you know that in OB52 SAP has provided option to keep two sets of posting period open at a time. Intention behind this is to help month end / year end closure activities. With the help of this function, first set of period can be closed for all end users and second set of period can be open for specific users to perform month end / year end activities smoothly. Now I am also sure that many of you don’t know how to do this setup. How to create Authorization group? How to assign authorization group to users? If you don’t know answer of these questions, keep reading..

Why two set of posting periods required in SAP FICO?

Let’s consider one scenario to understand importance of this second posting period with authorization group. In many big organizations month end / year end processes run through background job. Now usually posting periods closed for previous month in first five days of new month. Suppose a posting period of Nov closed on 4th Dec. users keep posting transactions to last posting period (Nov) till the very last moment of 4th Dec. and then suddenly the posting period is closed for everyone. Now backend job runs at a specific time, so in this case these jobs don’t get time to settle newly posted values on 4th December and so it starts failing next day onwards.

This is very typical and frequent scenario in many organizations. And this can be easily sorted out with the help of special posting period with authorization group.

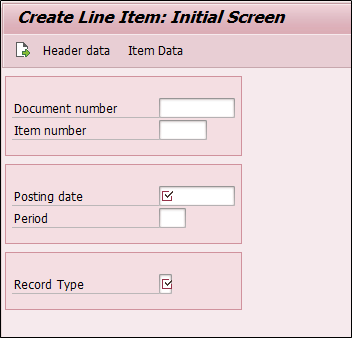
How to setup authorization group in OB52

If we check in OB52 for authorization group field there is no F4 (search help) button to select authorization group.

So it is confirmed that it is freely definable field. Or user is able to enter any 4 digit alphanumeric key as authorization group.

OB52 Transaction code

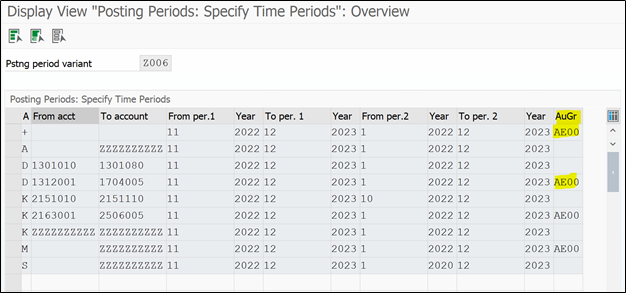
So here I have entered AE00 as authorization group for my company code. (We will come back to this part later)

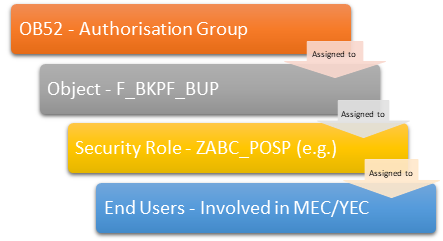
There is one object SAP has provided to control posting periods i.e. F_BKPF_BUP (Accounting Document: Authorization for Posting Periods) in this object we will enter our authorization group i.e. AE00 (same text entered in OB52)

Further this Authorization object F_BKPF_BUP is assigned to security role

And the security role is assigned to users. (We will see this with SAP Screens also in few seconds)

Let’s understand this with below diagram:

Assignment linkage

From above graph, we have seen how to create authorization group in OB52. Now we will see how to assign authorization object to security roles.

Read eBook: Controlling Profitability Analysis – Comprehensive guide to SAP COPA

How to assign authorization object to roles?

Here we have to ask security team to create a role with list of MEC/YEC transaction codes. Or whatever transaction codes user will be performing.

We will ask Basis team to assign authorization object F_BKPF_BUP to newly created security role with authorization object AE00.

In PFCG transaction Basis team will assign this object F_BKPF_BUP

PFCG – Transaction code

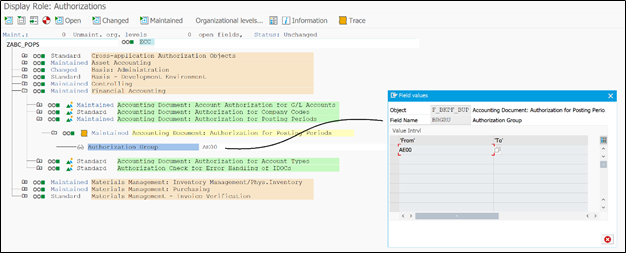
In above screen we can notice authorization group is entered in authorization object and it is assigned to security role ZABC_POPS.

We will need basis help to perform this activity, but it is also important for functional consultant to know the end to end process.

We can have different authorization group for different users, for different tcodes etc. it will just increase the number of security roles.

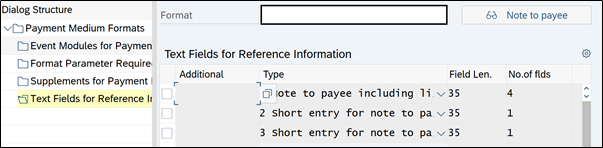
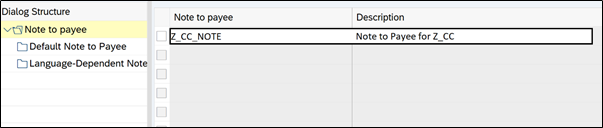
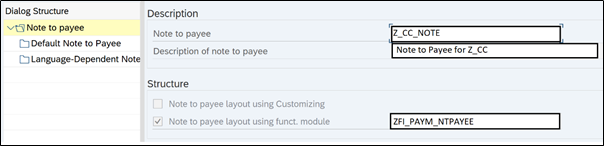
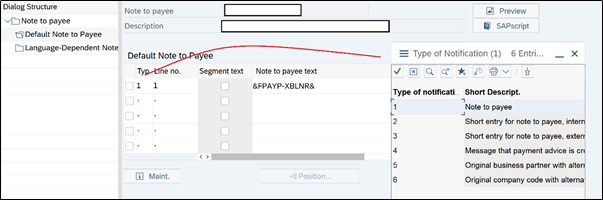
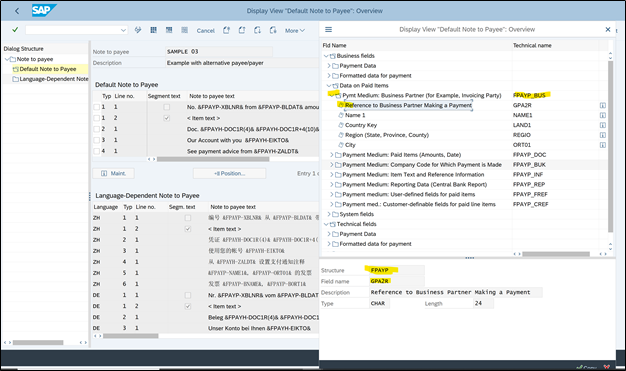
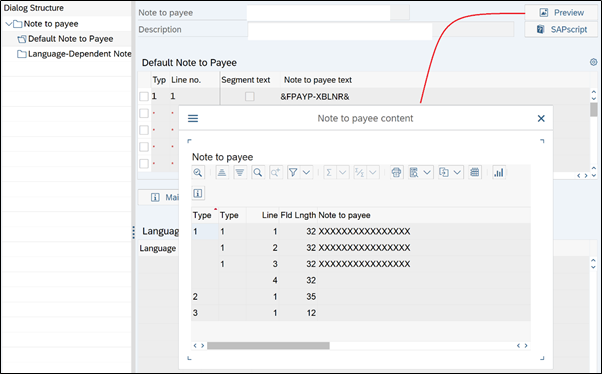
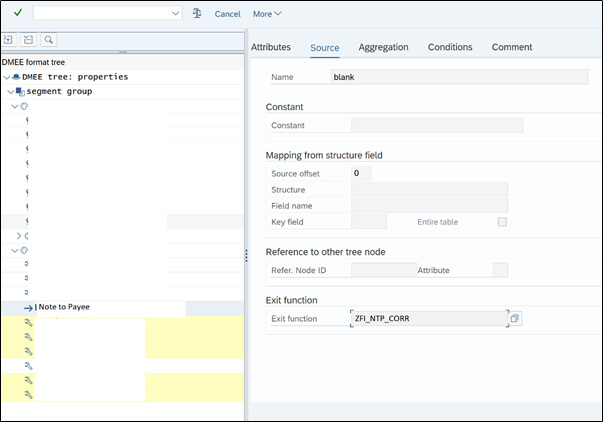
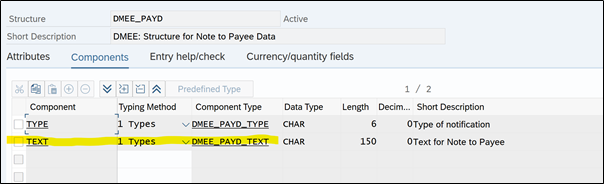
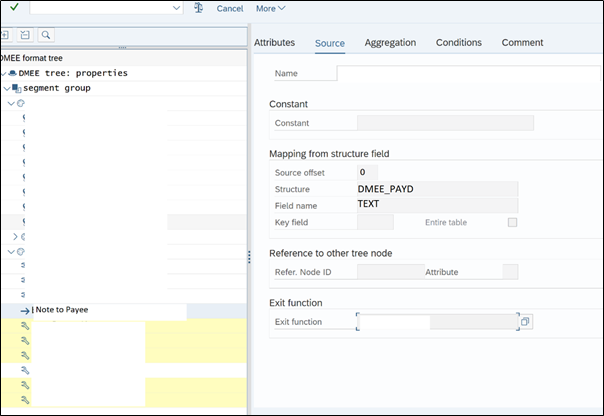
Also Read: Note to payee functionality in SAP DME

How to find which users have authorization to post in special posting period? Or

How to check OB52 authorization group assigned to which users?

Well this is actually tricky and most asked question, because creating authorization group and assign it to roles and further to users it straight forward, but we will see how to reverse engineer the process.

Below are the steps to find out users which have authorization group:

We have authorization group – AE00 & we know authorization object is F_BKPF_BUP

First thing we will find out the roles that have authorization object F_BKPF_BUP

Transaction code SUIM

SUIM Transaction code

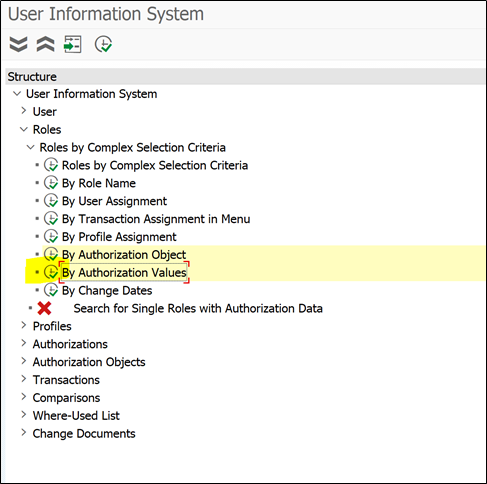
Select roles by authorization object

SUIM – Search by authorization object

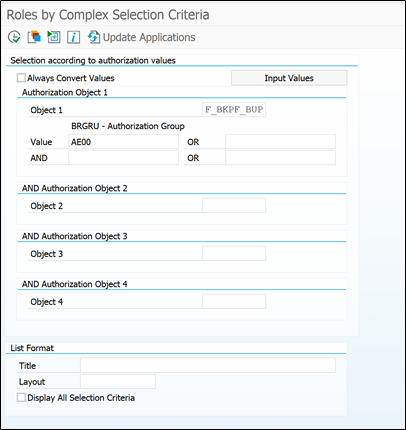
Enter authorization object and value in our case we want to search AE00

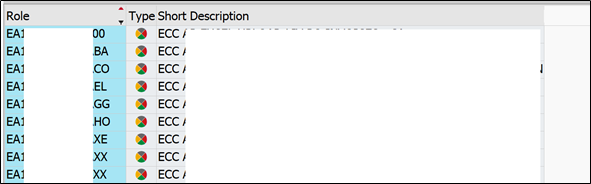
We will be prompted with list of roles that have above authorization object:

SUIM – Roles result

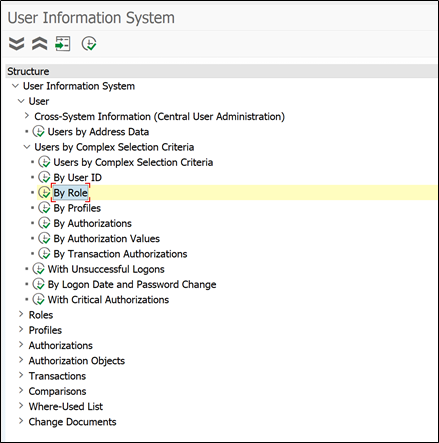
Now we have to see what are the users assigned to these roles, they should be able to use second set of posting periods.

To do so go to SUIM transaction code and search users by role

SUIM – Search user by roles

Execute it

SUIM – Search user by roles

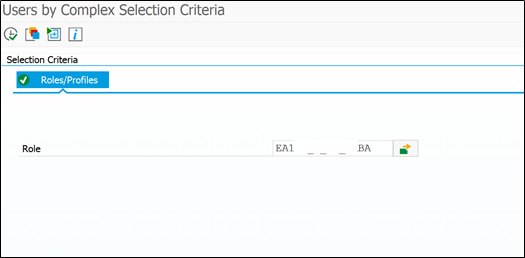
Enter all roles and execute it

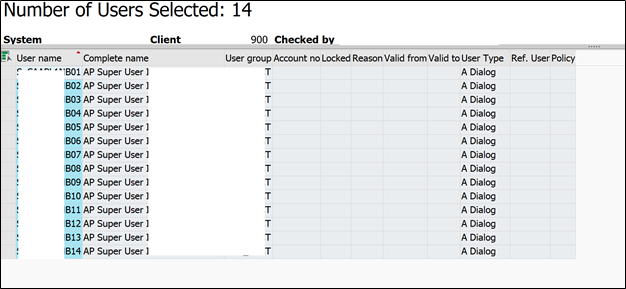
And here we go with the list of users who have authorization to post accounting documents in second set of posting periods.

List of users assigned to roles

Conclusion

These are so useful technique that can be used across modules in SAP. Hope you enjoyed the post. you can save the link of this post or bookmark it for future reference. Also sign up to below newsletter to get weekly blogpost update.

What we learn in this blogpost:

  • Two set of posting periods in OB52
  • Authorization group setup in OB52
  • Assignment of authorization object to roles
  • Check OB52 authorization group assigned to which users

If you enjoy the blogpost, then you can stay connected with us on below platforms:

YouTube

LinkedIn FICO Page

LinkedIn ABAP Page

LinkedIn Logistics Page

Instagram

Read More
ERP College January 9, 2022 0 Comments
FICO

Everything about derivation rule in SAP Controlling Profitability Analysis (Derivation rule in SAP COPA)

Derivation rule is widely used function in SAP COPA. In this blogpost we will explore all the aspects of derivation rule. Below is the taste of blogpost:

  • Introduction & use of derivation rule
  • Types of derivation rules
  • Step by step configuration of derivation rule
  • Conclusion

Introduction & use of derivation rule

In COPA documents we know that system collects characteristics and value fields. Derivation rule helps to determine/derive characteristics by having different conditions and rules. It also helps to override what has been derived by the system, you can create a derivation step to determine the characteristic values during posting of the CO-PA documents.

Disclaimer: This blogpost is a chapter of eBook Controlling Profitability Analysis. In order to consume this blogpost more efficiently, you should have fair understanding of COPA. If you are new to SAP COPA or want to deep dive into this sub-module, then you can consider reading this eBook.

Below infographic helps to understand, how derivation helps to determine/manipulate determination of characteristics in COPA document.

Derivation rule structure in SAP COPA

Note: Derivations are used only for characteristics. You can’t modify value fields using derivations.

The CO-PA derivations are defined by five different types of derivation steps:

  • Derivation rule – This rule is based on an “if-then” where you define a condition and a derivation to use if the condition is met.

In above image, we can notice product group and strategic business unit is maintained in combination. So it will be like, if product group is ‘100’ then derive strategic business unit ‘electronic’

  • Table lookup – System will read a specified table that contains a key that must exist as a characteristic, and then it will derive the field content from this table to the characteristic if the characteristic has the same definition as the table field. It can be used, for example, to derive a value from the material master table that is not present in the posting document. (it will be more clear when we will see config in upcoming section)
  • Move – This step will move a characteristic value or a constant to a target field.
  • Clear – This step will delete the characteristic value.
  • Enhancement – If you want to create a custom program to define the characteristic derivation, use COPA0001.

In below sections we will see the configuration for each characteristics derivation type.

Also read: Functioning of CO-PA in make to order scenario

Step by step configuration of derivation rule

Access the activity using the following navigation options:

SAP Easy AccessControlling -> Profitability analysis -> Master data -> Define characteristics derivation
Transaction codeKEDR

Click on the create button

Select the derivation rule and hit enter

Derivation rule config screen SAP COPA

You will be prompted with the above screen

In this screen, you’ll enter the step description and then build the derivation rule. In the Source Fields area, you select the “If” condition for the derivation, and in the Target Fields area, you select the “Then” field.

After defining the “If and Then” for the derivation rule, click on Maintain Rule Values button

 to update the values for the Source Fields and Target Fields.

Here you can see the rule, as per the rule, whenever the characteristic customer containing value 105 then the sales district characteristics will be updated as NORTH

Read eBook: Manual and electronic bank reconciliation in SAP

Returning to the first customizing screen, two more tabs are left to discuss: Condition and Attributes.

In the condition tab, you can further restrict the derivation rule by defining user filters for the derivation selection. The last tab, Attributes, shows additional options for the derivation rule.

With this condition, now the above derivation rule only be valid for IN country key

In the Attributes tab, you can define whether the system will issue an error when the derivation doesn’t find a value to derive, define if the validation will have a starting date, and restrict the validation by removing the from-to option.

Common error in practice
If you indicate that an error will be issued when no value is found for the derivation, it will block the creation of the CO-PA document, and consequently the FI document. Make sure this is the desired outcome before choosing this option.

Table Lookup

Click on the create button

Select the table lookup and hit enter

Enter the table name, from which table you want the value in COPA field.

Source Fields

In the below image we can see that following information has to be maintained:

  • Origin (Table Name) and Origin Field (Field Name) from standard table
  • Origin (CO-PA) and Origin Field (Field Name)

This information works as the basic condition, in the below example we can see the KNA1-KUNNR as source in standard tables and COPA-KNDNR in CO-PA Tables. This means the value in COPA-ARTNR is to be passed on to table KNA1 under field KUNNR to identify the information under target field.

Target Fields

In the below image we can see that following information has to be maintained:

  • Origin (Table Name) and Origin Field (Field Name) from standard table
  • Origin (CO-PA) and Origin Field (Field Name)

This information under KNA1-KTOKD i.e. Customer account group is identified in the table for KTOKD value available from source field and is passed on to KDGRP field under CO-PA.

This rule will get the customer number from COPA document and search it in KNA1 table, it will find out the customer account group and enter in COPA Field KDGRP.

The functioning of other two tabs condition and attributes is same here also; in condition tab we can assign more condition to apply this rule, e.g. making this rule valid only for specific sales org.

  1. Move

Hit enter

Here we are moving the product number to material number field

And as required condition tab is also available as this kind of rule cannot be applicable for everyone you can make it specific to any smallest object. E.g. you can validate this rule to one customer also.

  • Clear

Select clear

As the name suggest, it will remove the values from field region in COPA.

These are all use cases and config of derivation rule in COPA.

Conclusion

Derivation rule is very important function of SAP COPA and it is used very often. At start the maintenance of rule may seem complicated, but once you configure it and test the result it becomes very easy and useful tool. You will find this structure of derivation rule configuration in multiple submodules like treasury & logistics.

Watch same blogpost in video format::

Hope you enjoyed reading the post. You can subscribe to our newsletter to get update of new blogpost.

If you enjoy the blogpost then you can stay connected with us on below platforms:

YouTube

LinkedIn FICO Page

LinkedIn ABAP Page

LinkedIn Logistics Page

Instagram

Read More
ERP College December 27, 2021 0 Comments
FICO

SAP New Asset Accounting in S4HANA – Transaction type

First let’s discuss transaction type in ECC.

What is the use of transaction types in Asset Accounting?

On high level, we can say that transaction types in Asset Accounting are used to differentiate business transactions like acquisitions, retirements etc. if we see the configuration screen of transaction type, one can notice that it controls Debit/Credit posting of asset, document type, asset history sheet group etc.

Transaction type configuration Tcode AO73
Transaction code AO73

Transaction type configuration Tcodes

  • AO76
  • AO75
  • AO74
  • AO73

Apart from this, there is one more important function of transaction type in ECC, i.e. to restrict postings to specific depreciation area.

How to restrict transaction type to depreciation area?

To use this feature companies, have to configure thousands of transaction types.

Transaction code OAYA to restrict transaction type to specific depreciation area:

Transaciton code OAYA
Transaction code OAYA

Let’s spend few seconds to understand why it is important to restrict some of the postings to specific depreciation area.

You know that, we assign leading and non-leading ledgers to depreciation areas. And accordingly depreciation areas post to that leader. Further ledger represents the valuation area e.g. Local Valuation, US GAAP valuation, Group Valuation. In many instances, user has to post specific entries in specific valuation area. In those cases, depreciation area leads the way by using correct transaction type.

In ECC Asset Accounting there is not dedicated transactions that allows to post documents ledger wise. So the transaction key plays the vital role in posting documents to appropriate ledgers.

Flow of depreciation area determination

Transaction type determines depreciation area to be posted and depreciation area determines ledger to be posted.

Also Read: Note to Payee Functionality in SAP DME

This is cool to know the structure, but multiple countries have multiple chart of accounts, which further have many depreciation areas and this leads to creation of many transaction types depending of the geographical size of organization.

This problem has been solved in S4HANA.

Asset Accounting Transaction Types in S4HANA

In new Asset Accounting, it is not possible and also not necessary to restrict transaction types to depreciation areas. This is not necessary since, in end user transaction codes itself SAP has provided option to restrict the posting to depreciation area or accounting principle level. This means you have option to select the depreciation areas to be posted while posting document.

This change has significantly reduced the number of transaction types that need to be defined in the system along with the time consultant has to spend configuring these transaction types.

Let’s see some end transaction codes in Asset Accounting:

Transaction code ABAON

Transaction code ABAON
Trasnaction code ABAON

You can notice in above screenshot the highlighted area shows the option of manually entering Accounting principle (Ledger) and Depreciation area.

So no need to stay dependent on transaction type. Accounting principle itself determines ledger to be posted.

Read eBook: Manual and electronic bank reconciliation in SAP

Conclusion

In S4HANA transaction type is still relevant for its configuration control of AO7* setup. But the dependency to post ledger specific documents is being reduced. This become possible because S4HANA has option to have multiple leading depreciation area at a time and all depreciation area can post real-time.

If you want to know more about changes in S4 compared to ECC, you can give try to this eBook.

Also enjoy this free eBook – End user manual for New Asset Accounting.

This brings us to end of the blogpost. Hope you enjoyed reading it. You can subscribe below to get email of new blogpost. Also you can connect with us on below platform.

If you enjoy the blogpost, then you can Subscribe to our newsletter and receive email notification for new blogpost, also stay connected with us on below platforms:

YouTube

LinkedIn FICO Page

LinkedIn ABAP Page

LinkedIn Logistics Page

Instagram

Read More
ERP College December 22, 2021 1 Comment
FICO

Note to Payee Functionality

Note to Payee is a functionality available in SAP DME to meet legal / bank requirements of additional details along with payment file.

Also, many times, note to payee information is required by bank/supplier, along with DME XML/FLAT file.

Basically, note to payee is information of paid line items for each vendor/business partner. Note to payee can be any information about payment as per the requirement of bank.

Below are few e.g.

  • Legally required information of each payment
  • Official document number, which is being paid
  • Common reference number between business partner

So note to payee is just additional information you have to print in output file. Just like we print other payment related details. Hence it is possible to do same kind of mapping in DMEE tcode itself and print these details. But SAP has provided separate function of Note to Payee to have greater flexibility.

Note: As a prerequisite to have fair understanding of this blog post, one should be familiar with DME functionality and DME tree structure. If you are new with DME then you can refer this eBook to learn DME.

Configuration steps for Note to Payee functionality in SAP:

Below transaction codes need to configure Note to payee in SAP:

  • Payment medium format (OBPM1)
  • OBPM2
  • FBZP
  • DMEE
  1. Payment medium format (OBPM1)

Select the concern payment format and go to tab ‘Text fields for reference information’

Here enter the information like type, field length, no of fields.

Field length will depend on requirement, where as No. of fields will depend on payment file structure. Let’s say if you have configured DME tree like separate line for each invoice then No. of fields 1 is sufficient.

But if you have configured DME tree for separate line for each vendor (multiple invoices) then No of fields should maximum like 99.

  1. Note to Payee (OBPM2)

From the same screen you can either click on Note to Payee button or go to transaction OBPM2

Create note to payee nodeCreate Note to Payee node

Then select option – Note to payee layout using function module and enter the function module name

Before this step as prerequisite this function module should be available/created. When you will ask ABAPer to develop such function module below are the things you should ask for apart from field and data logic:

  1. This function module should be called at the time of payment run
  2. Whenever Create payment medium checkbox is ticked
  3. Data of Note to Payee should be stored in table DFPAYHT

DFPAYHT table should store values as per the structure of Note to payee

Table DFPAYHT

Note: Reference FM for creating ZFM is – FM FI_PAYMEDIUM_SAMPLE_DETAILS

Well, if you want to go for customizing option, then it includes below steps:

Go to ‘Default Note to Payee’ section in OBPM2 after ticking ‘Note to payee using customizing’ option

Here in this tab we have option to play with SAPScript data. As you can see in notification type we can select the behaviour of output for Note to payee text field values. Values can be taken from three structures FPAYP, FPAYHP & FPAYHX. If you are confused about variables or other signs then just click F4 in Note to Payee text field and just select required fields.

You can also check the preview by selecting preview button for your payment medium format

These fields will be updated in table DFPAYHT.

Also Read: Functioning of CO-PA in make to order scenario

  • Maintain payment program FBZP

Select payment method in country

Select Country and payment method and go to tab Note to payee origin

Here in note to payee field enter the note to payee name which we created in OBPM2 transaction. This will help trigger FM and correct note to payee.

After this go to DMEE tree

Here we have to modify DMEE Tree and link note to payee in DME.

Create a node for Note to Payee where note to payee details should appear. This node is based on exit function. We need new function module for this node. Remember the function module we created and assigned in OBPM2 settings, that FM updates table DFPAYHT right. Here we need FM that can pull the information updated in DFPAYHT.

Checkout eBook: Manual and electronic bank reconciliation in SAP

a

If you remember previous screenshot of DFPAYHT table, there all the fields of note to payee is stored in separate line. So this FM should concatenate these fields into one single line.

Note: Reference FM to create ZFM is – DMEE_EXIT_TEMPLATE_ABA

Alternate to this option, if you don’t want to use exit function module, is to call structure DMEE_PAYD – TEXT

You can also visit this similar blogpost on Note to Payee functionality.

Below are some important points to note in Note to payee functionality:

  • Most of the times to match the requirement, standard customizing is not enough so in that case custom FM is much better and useful way to configure Note to Payee
  • Note to Payee is like free form text, it changes from bank to bank, organization to organization. In some cases, it is mandatory to print note to payee info in DME file. In some cases, it is not even required

This is simpler than how it looks; you just need to try this once. If you want to know more about DME then consider reading this eBook.

If you enjoy the blogpost, then you can stay connected with us on below platforms:

YouTube

LinkedIn FICO Page

LinkedIn ABAP Page

LinkedIn Logistics Page

Instagram

Also subscribe below to receive update of new blogpost

Read More
ERP College December 18, 2021 1 Comment
FICO

Functioning of CO-PA in make to order scenario

SAP COPA (Controlling Profitability Analysis) has separate process to handle MTO (Make to Order) and MTS (Make to Stock) scenario in SAP. In this blogpost we will discuss how SAP separates these two process and how it impacts the processing of COPA Documents.

Not every time billing document post to the costing based CO-PA. One of the major reason behind this behavior is make to order scenario.

In MTO process the gap between sales order and billing is huge. As the name suggests, in make to order process, personnel need to wait for billing until the product is not manufactured. When we create the sales order it is considered that the revenue is going to generate in the near future but it will not appear in CO-PA until and unless billing is not generated. To fulfill these discrepancies SAP CO-PA provides us the option to post the values to CO-PA before the billing through sales order.

Introduction

Sales order can be fulfilled by made to order process or made to stock process. In make to order scenario billing document does not posts to the CO-PA.

No CO-PA document generated

In this case we need to transfer the values to CO-PA from sales order by transaction code VA88.

Now how to differentiate MTO and MTS scenarios technically?

It is easy to understand MTS scenario because process is plain in make to stock scenario. But when we create MTO, in this case we have to produce material against specified sales order. Again this is in theoretical terms.

In technical terms to satisfy the MTO case, billing document will have an account assignment tab to a sales order in addition to the PA segment. (Refer attached screenshot of billing document)

Account assignment to sales order

In addition to this, on sales order level field VBAP-KZVBR = E is mandatory.

Also Read: Tips and tricks on Bank Reconciliation in SAP

How to meet above criteria’s?

Materials determine whether sales order is going to be considered as an MTO or MTS. From the material master the requirement type is determined and requirement class from requirement type. In requirement class we do all the necessary configuration, through which system understands or allows CO-PA documents to be posted from VA88 transaction instead of billing.

Requirement Class

Here we have consumption field E which means accounting via sales order.

Because of the above settings we can see on sales order level we get account assignment tab with below details:

Account assignment tab

We can see PA segment has collected characteristics to post into CO-PA documents.

We need to set the settlement rule through which we can settle the values to CO-PA

Change settlement parameter

Settlement parameter can be changes on sales order level as well. (Refer above snapshot)

Settlement Rule: Parameter

Here you can change the settlement profile and PA structure along with the Allocation structure. These changes will be specific to the sales order level.

Click on the settlement hierarchy to get the object number

Settlement hierarchy

Here the object number is 39234280, this number keeps changing when we make changes in sales order or in flow of the sales order. This object number makes sure the order is settled or need settlement. We can check how many times one sales order is settled with this in table AUAK.

Settlement Rule: Hierarchy

Read eBook: SAP DME – A Simplified Guide

How to settle sales order values to SAP COPA?

Until and unless you did not settle the sales order to CO-PA the values will not appear in profitability reporting. Now this seems to be an additional activity, but we have a solution for this too, just stay with us.

To settle the sales order in CO-PA –  go to transaction code VA88

Transaction code VA88 in SAP
VA88: Actual settlement of sales order

Enter the sales order details and execute first in test mode then in production mode and this way we can settle the sales orders to the COPA.

What if wrong values settled to COPA?

The way we settle the order to PA, the same way we can reverse the settlement from VA88.

VA88: Reversal of Actual sales order settlement

Fill the sales order details and click on Reverse from settlement menu.

And the sales order will be reversed.

What if I have to settle multiple sales order with more selection validations?

For the background processing or to settle sales order through background job there is one program which can be used.

RKO7VA88 is used for settling multiple order or scheduling background job for sales order settlement.

ABAP: Program Execution

Execute the program

Program RKO7VA88 in SAP
RK07VA88

Here you can see you have a multiple options to select sales order by filtering with various criteria’s.

This program is useful in scheduling background jobs, in so many projects almost most of the clients go for automation in sales order settlement. To achieve this requirement you should have the knowledge of how to schedule a background job. You just need to simply create a selection variant with dynamic date in this program and use this variant in a background job.

What if I have to make the minor changes in CO-PA document?

You can also post the manual line items in CO-PA with the transaction codes:

KE21/KE21N – Create document

KE23/KE23N – Display document

KE21 – Create Document

KE21 Transaction code in SAP
KE21: Create line Item

Enter the reference document number and create line item, you can also post negative values in the CO-PA.

What if I have to change the data in CO-PA?

You have two options to change the existing data in CO-PA

  • Use transaction KE4S – this transaction reverses a COPA doc and repost it with reference to billing document.
  • Use KEND transaction – it simply changes the values w/o any repost. E.g. If customer 1001 is tagged to customer group XYZ from 1st Nov Onwards and you want all old data to get reassigned to XYZ instead of ABC, then you use KEND

You can also watch below video post of this blogpost:

Thanks for reading the blog, if you want to learn CO-PA more deeply and want know the tips and tricks, which will be helpful to solve or analyse CO-PA issues more efficiently, then you can read this amazing book Controlling – Profitability analysis (CO-PA): Comprehensive coverage of the SAP CO-PA module

If you enjoy the blogpost then you can stay connected with us on below platforms:

YouTube

LinkedIn FICO Page

LinkedIn ABAP Page

LinkedIn Logistics Page

Instagram

Also subscribe below to receive update of new blogpost

Read More
ERP College December 26, 2020 0 Comments
  • 1
  • 2
  • 3
  • 4
  • 5
  • Home
  • About
  • Contact
Categories
  • ABAP 8
  • FICO 23
  • General SAP 29
  • MM 1
  • SD 2
Products
  • SAP Classic Vs New GL Accounting
    Rated 5.00 out of 5
    ₹999.00 ₹799.00
  • Manual and electronic bank reconciliation in SAP: Step by step guide for EBS with real time business scenarios
    Rated 4.00 out of 5
    ₹250.00 ₹229.00
  • SAP Accounts Payable (AP) Training
    Rated 4.00 out of 5
    ₹1,999.00 ₹1,699.00
  • SAP DME - A Simplified Guide
    Rated 4.50 out of 5
    ₹349.00 ₹280.00
Sign Up to get update of latest Blogs

Find Us

Address
123 Main Street
New York, NY 10001

Hours
Monday–Friday: 9:00AM–5:00PM
Saturday & Sunday: 11:00AM–3:00PM

About This Site

This may be a good place to introduce yourself and your site or include some credits.

Contacts
Website: https://erpcollege.co/
Email: expertsask994@gmail.com
Terms & Condition

Copyright © 2020 ERP College by Smarksys Technologies. All Rights Reserved.