This is second part of this blog series. (Read first blog here – FEBKO details)
In continuation with previous blog, we will start this one with FEBEP table.
Introduction
FEBEP table stores line item records of bank statements. FEBKO & FEBEP table can be compared with BKPF & BSEG table, earlier one stores header information and latter one stores line item information.
If you check FEBEP Table fields, you can notice it is hard to directly look into FEBEP table without referencing FEBKO table. So you should always start your search from FEBKO table, where you have various key fields to narrow down your result data as per the requirement. Once you got the relevant entries in FEBKO which you need to further dig into line item level, then you can take the common field ‘short key – KUKEY’ and search for it in FEBEP table.
Lets execute one record and start checking FEBEP table field
First field is short key, unique key for each statement and common field between FEBKO & FEBEP
Then we can see LC field i.e. line item completed. It will show if the posting of this particular line is completed or not.
So in FEBEP table there will separate line for each transaction of bank statement.
U1 & U2 field represents posting area 1 & 2 postings. If the line item is associated with posting rule, which has accounting entry in two areas, then system will check if both areas are posted or not. This can be verified by x mark in U1 & U2 field.
Document number & posting date is document posted in SAP against statement transaction.
Further we have fields like account currency, amount of transaction. BTC – Business transaction code is used to determine posting rule based on the mapping in OT83. So here in FEBEP, system will capture the BTC (VORGC) from bank statement and search in OT83 if there is any external transaction code available of same character, if it is available then system will put it into FEBEP external transaction field (VGEXT). Posting rule (VGINT) will be determined from external transaction code.
There are several fields for partner bank details. These will be populated in case of clearing open vendor invoice.
Then there are various BDC fields available, which are supported by search string. If you remember there are various options available in search string setup to manipulate the final posting.
Then there will be fields like interpretation algorithm, it will have interpretation algorithm number which is used to post this line.
This all field data will make sense if you know the underlying configuration and how it evolve in each process. If you want to learn search string configuration, interpretation algorithm & posting rules with multiple posting areas, then you can read this ebook.
With this we have come to an end of this two part series blogpost. Hope you enjoyed reading it and learned few things. You can subscribe below to receive email update of every new blogpost:
These two tables comprises 70% of bank reconciliation. FEBKO & FEBEP are very close to those who are working in Bank Management area. Even though it is very important tables still many don’t know much about these tables. So in this blogpost we will be covering, what is the use of FEBKO & FEBEP table? What are the major key fields in FEBKO & FEBEP tables? How to get most out of these tables?
What is FEBKO & FEBEP table?
First lets understand the basic process of bank reconciliation in SAP. (Few can skip three paragraphs below if you already know about reconciliation process)
So there are two books of accounts involved in this process, one is of internal organization ledger maintained by organization and other is bank ledger maintained by bank. Two different parties trying to maintain same set of information in two different places. Whenever such situation happens, reconciliation jumps in. (this is something to be solved by blockchain technology).
User makes payment in SAP and book journal entry in Bank GL account (this is assumption). Same payment details send to bank (nowadays mostly electronically) via DME in SAP. Banks make the payment and book entry in their own ledger (this is actual). But sometime bank fail to make payment and don’t make any entry in their ledger, sometime bank make additional entries into their accounts for interest & charges (all are actual entries impacting your bank balance). But your SAP system don’t know about these transactions yet and so does the mismatch comes. And the reconciliation is required to match these two sets of books of accounts.
In SAP there are two ways (technically) to reconcile the balances. One is manually entering statement entries into system and reconciling through FF67. And other way is just uploading electronic bank statement in system through FF.5
If you want to learn entire process and configuration of manual & electronic bank reconciliation then you can read this ebook.
Now come back to our heading, what is FEBKO & FEBEP?
Before exploring these tables one should know that, Bank management is submodule of SAP FI, just like AA, AP, AR & GL. Hence just like in asset accounting, there are separate set of tables for asset accounting data and separate tables for storing accounting postings in GL area, in bank management also FEBKO & FEBEP tables are part of bank management and it does not store any accounting related data.
When you will run bank reconciliation transaction whether it is FF67 or FF.5, it will create some entries in FEBKO & FEBEP tables. Later on end user/ supervisor will check the bank statement data and post it to accounting (FEBAN process). At this stage accounting document tables BKPF & BSEG will be updated. Along with FEBKO & FEBEP with accounting document number.
FEBKO – Electronic Bank Statement Header Records
FEBEP – Electronic Bank Statement Line Items
As the description suggest FEBKO stores header records, it means for each bank reconciliation run in combination with house bank and account id FEBKO will have one line record generated.
FEBEP will have all the line items that are there in bank statements.
Fields of FEBKO table
FEBKO stores header records of bank statements in almost 109 fields. Obliviously we will not look into each and every, but we will see those which are important to know.
FEBKO Table
Whenever you will post bank statement via FF67 / FF.5 it will create one row in FEBKO table and multiple rows in FEBEP table depending on statement line records.
Now let’s see what information is available in FEBKO table:
Application field – It helps to filter records based on its application. You can see 0001 is for bank reconciliation. Similarly 0004 is used for account balance records (bank send these records as part of intra day statement). Lockbox & check deposit transactions can also be seen based on usage.
Sending bank will have account number and currency combination.
Statement ID is internally assigned unique statement number to each bank statement.
Next important field is short key, it is unique key assigned to each record of FEBKO irrespective of application. This field is used across tables and programs to identify unique statement record.
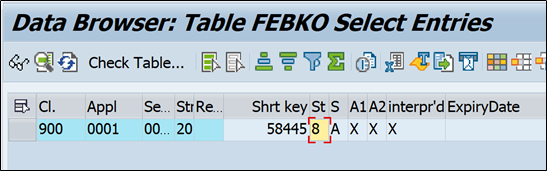
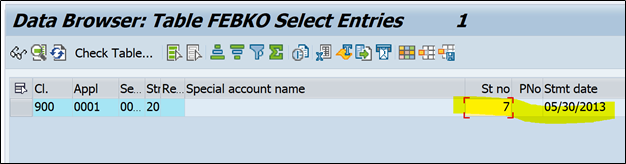
Let’s check one record:
In FEBKO –
In above screenshot you can see application number is 0001 so it is bank reconciliation entry. In sending bank field there is bank account number and currency (but we also have dedicated fields for account number and currency). In statement ID internal statement number is assigned. Short key is the unique number against this record, which you can use in any other tables/programs to find out this statement record.
Short key field is also a link between FEBKO & FEBEP table.
There is one program RFEBKA96 to delete bank statements from Bank management module (delete data from FEBKO, FEBEP.. etc)
If you execute this program in SE38:
You can see it is asking for two values one is application, 0001 for bank recon statements, 0004 for account balance statements
And other field is ID, it is nothing but short key.
So let me execute this program with above statement (application 0001 & ID 205978)
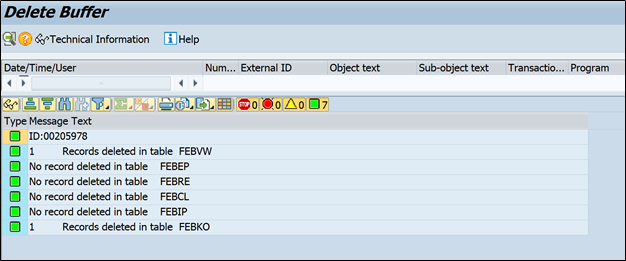
And here we go, got exact statement with statement id. now lets delete it from here.
It will show you how many tables data is deleted with this activity.
And you can notice all are bank related table, so this statement is disappeared from bank managent system but if this statement has posted any accounting document it will be still there. That will need manual reversal.
So mostly this is used when no accounting document is posted and you want to upload new statement.
Now coming back to FEBKO table fields
You can notice above there are several fields to filter out the statement records.
There is one more field that one should pay attention to and i.e. statement status (ASTAT)
This field will contain below values and by looking at it, you will be able to understand what is the posting status of this bank statement.
0 – Being entered 1 – Being post edited 2 – Entered =20 3 – Post edited=20 4 – Being posted 5 – Delete ID reset 7 – Posting incomplete 8 – Posting complete 9 – Deletion ID set
Whenever status will be 8 it means bank statement is fully posted without any error, Similarly 0 means statement is uploaded by selecting – ‘Do not post’ option. 7 – posting incomplete will tell that some of line items are not posted to accounting yet.
Next to statement status there are two fields A1 (Area 1) & A2 (Area 2). While defining posting rules you have option to define two accounting entries in two areas. It is used for clearing customer/vendor open line item along with incoming/outgoing bank GL line item. These fields will represent that two accounting entries, if marked with X means both entries are posted without any error.
(the above scenario is explained in more detail in this ebook)
Statement number represents unique statement received for that specific bank account number. System also do not allow duplicate statement number for same bank account number.
Statement date is also taken from bank statement. It also represent the date on which transactions took place.
As we discussed FEBKO is header level table, so it also display the total debit & credit posting of statement and along with opening and closing balance.
These are all important field of FEBKO table, it helps a lot if you know what is the use of these fields & from where it is updated.
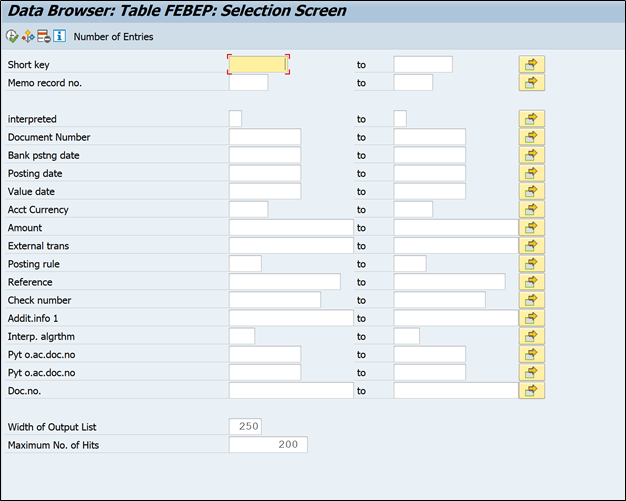
Next in FEBEP table we will see information about accounting documents, posting rules, interpretation algorithm
First thing first, lets understand what background job is and use cases of it (few can skip to next heading).
How I come to know about background jobs first time? SAP forced to use it. At the time of executing depreciation program, got an error that live depreciation run cannot be executed online, and it should be posted through background job. So I executed background job from AFAB transaction. From Menu – Program – Execute in background.
So 1st use case – It saves end user time. Many times if we execute any transaction which take several minutes to complete, background job can save you that time. Also think about risks involved in doing online run. If you are executing complex transactions which involves critical subsequent activities and if the running server were not able finish that activity within 15-20 minutes, you will get ABAP run time error. Many times your connection might get down, due to VPN connectivity issues or internet connectivity.
On the other hand if you schedule that activity in backend, SAP will allocate one separate server for the program to run and it will not be dependent on user connectivity or activity. User can log out and log off their system. The job will do their work.
2nd use case – Automation. Background jobs are nothing but bots that are helping to automate small to long processes. Because it gives the flexibility of schedule time. You can schedule job whenever you want at whatever frequency you need. Within job you can set different set of programs to run after another. You can trigger job based on various events.
In large organizations 70-80% processes run through background jobs. Background jobs are very crucial part of SAP, one should know in and out of background jobs.
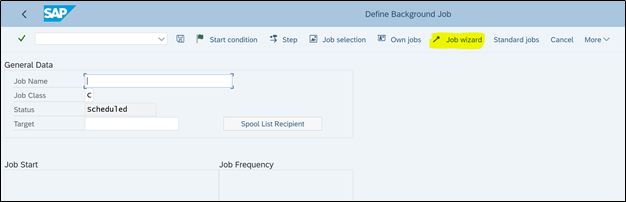
There are two ways to schedule job, one is where you enter details in multiple fields in multiple places and another is through wizard, where SAP walk you through whole process. Job Wizard is very useful and handy tool and still very underrated. Whenever there will be any need to schedule job in production server, you will have to schedule it through SM36 transaction only. Lets say you have run depreciation run in production system, but most of the cases you will not have authorization to AFAB transaction, so in this case you need to schedule one job in SM36 with depreciation run program and appropriate variant.
Go to SM36
SM36 – Transaction code
You will find the Job wizard icon in Menu (highlighted above)
Click it to launch the wizard
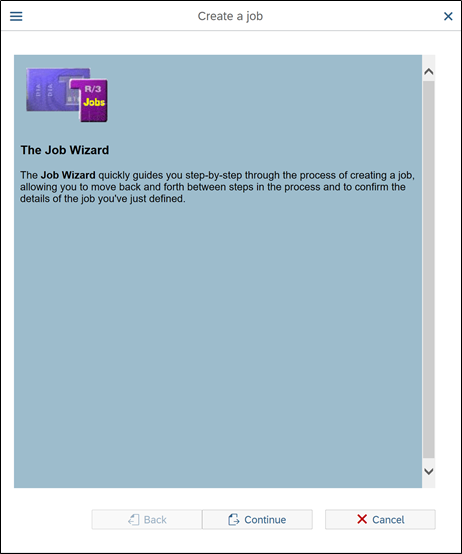
You will be prompted with the below screen
Job Wizard
It says everything about itself on first screen – “The Job Wizard quickly guides you step-by-step through the process of creating a job, allowing you to move back and forth between steps in the process and to confirm the details of the job you’ve just defined.”
Click on continue to proceed
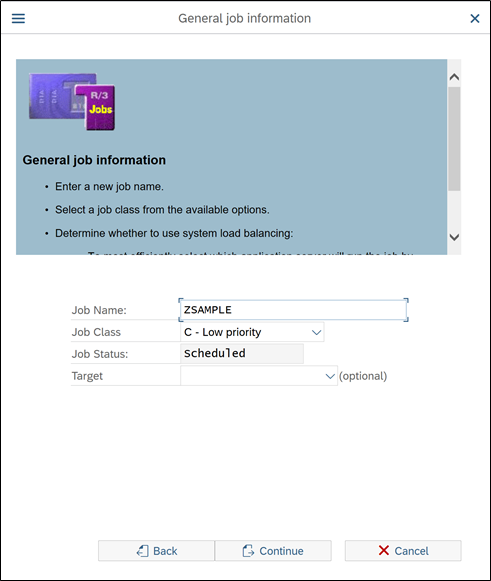
Give some meaningful name to Job (unlike given above)
Job class should be as per job priority. System will allocate appropriate space from the server based on job priority.
Job status will be grayed out with default status
In Target field, there is option to select in which server you want run the job. Usually there is dedicated server created for each modules and some additional servers for big activities. Although it is a optional field, so if kept blank it will determine server itself. It does not matter much for small jobs. But for huge activities where processing data is large and for complex activities, it needs to run on separate servers so that other processes don’t get disturb.
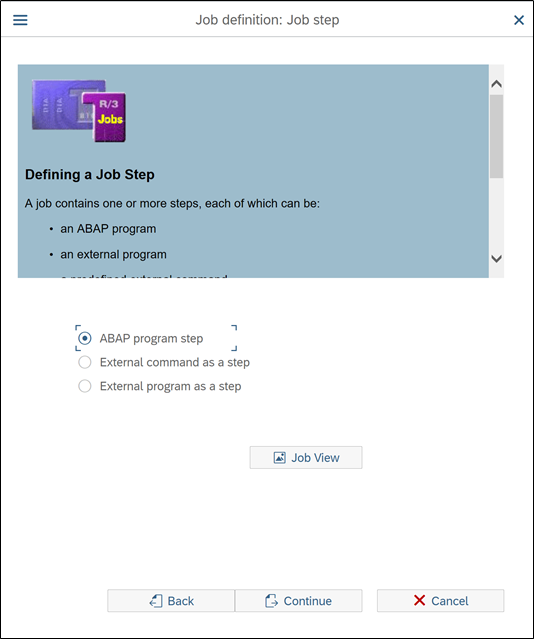
On the next screen, select ABAP Program step (Never used other radio buttons)
Press continue
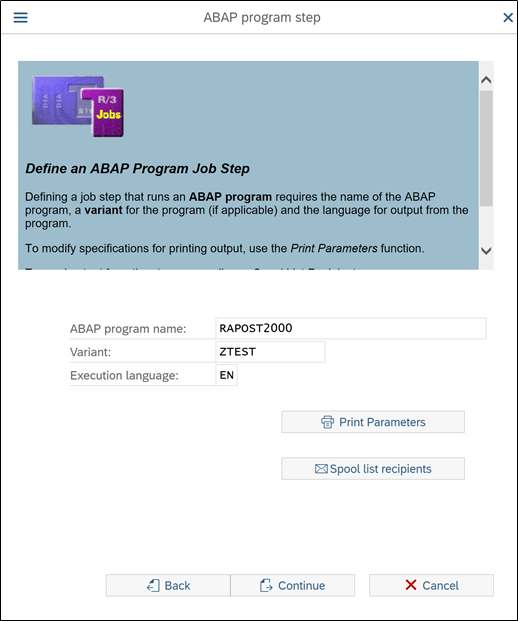
Here you have provide ABAP Program Name and Variant for the program.
There is one program available for every transaction in SAP to run it in background (with selection screen). There are many ways to get program name. Simplest one, just Google it.
Variant – Create one variant for program with the selection criteria you want. (In my experience there will always be a variant available which can suite your requirement)
Not going into details about how to create variant, assuming everyone aware of it.
After entering program and variant name, press continue
If you notice closely in each screen of the wizard, there is explanation given on top for every field and why it is require/ what does it do.
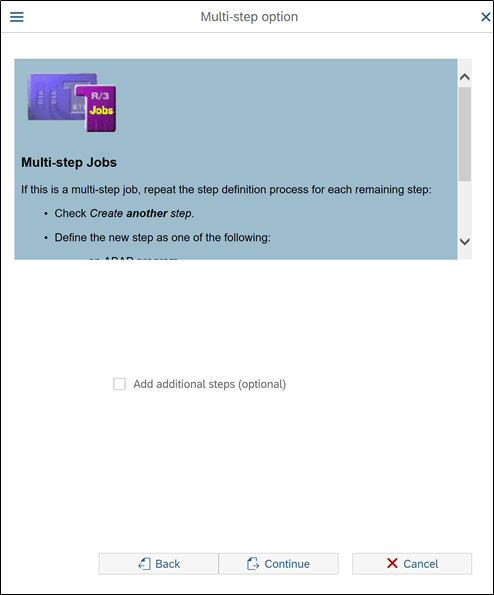
In below screen, it is asking if you need multi step job. Explanation is given in upper side of screen. So multi step jobs mostly used to automate multi step processes. If you select add additional step option, then you will have option to add another program and its variant details. You can add as many program as you want, as per the running sequence.
So system will execute another program once first program is over.
We don’t need this option in our scenario, so just press continue
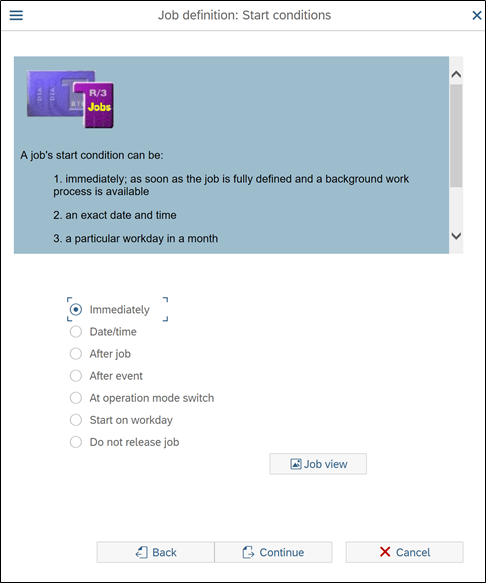
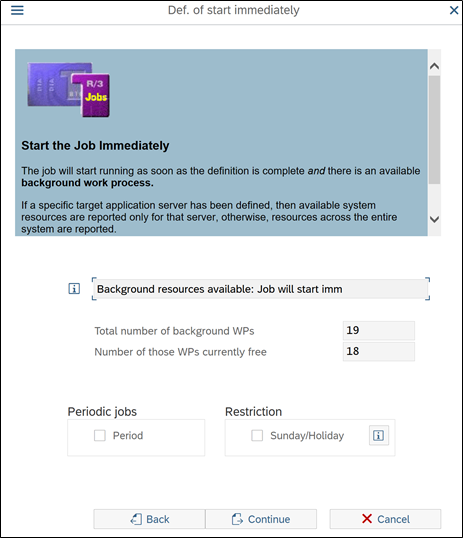
Here you will get to select schedule time and frequency of job. There are multiple option to trigger the job and each one is equally important. We need to release job immediately, so we will select Immediately option.
Press continue
On the next screen system will tell you, what is the current occupancy of servers and how feasible is it to run job immediately. This is very useful, when you will run the job in busy timeframe / busy system. Many time heavy job release can lead to other job failures and impact system performance.
Press continue
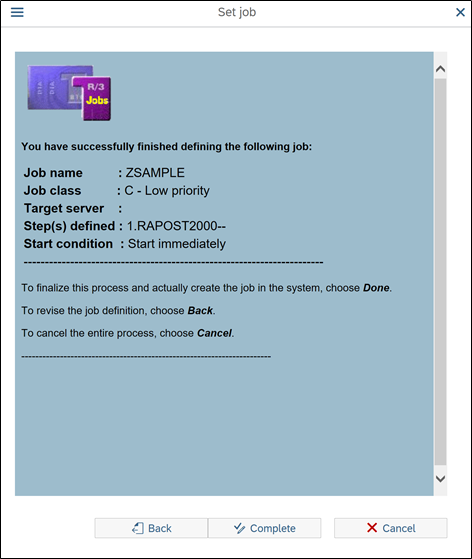
Last screen will give you all the details overview, you so far entered and ask for final confirmation.
Click on complete to release the job
And the job is scheduled. Very easy ah? Once you use it, you will get addicted to this wizard. Since I come across it, never scheduled job without wizard in SM36.
Scheduling job is one thing and monitoring it is another skill, if you know the key point one should check.
In SM36 jobs are scheduled and in SM37 jobs are monitored.
So without further ado, lets go to SM37
SM37 Monitor Job
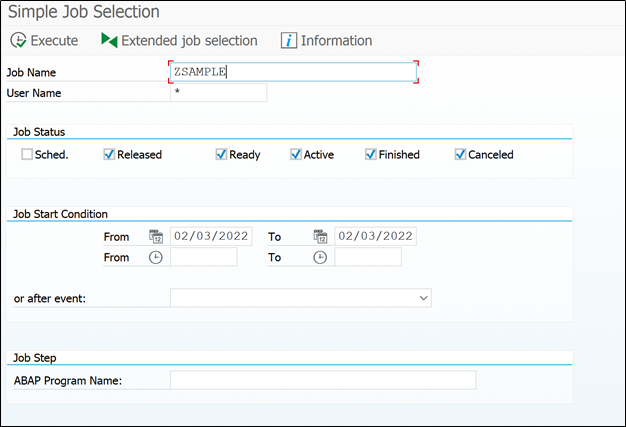
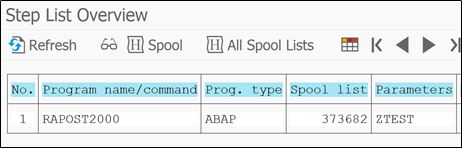
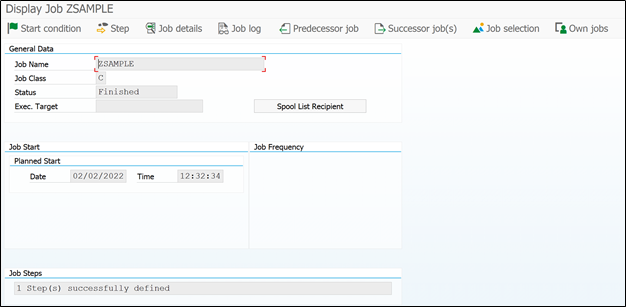
I will not bore you with the basic details of this screen. So we will enter the job name that we entered in wizard (ZSAMPLE).
You can also search job based on program name. In the last field of above screen you can enter the program name which is running underneath of job, in our case it is RAPOST2000.
So if you don’t know the job name and want to check what are the jobs that are running for specific program, this will be useful feature.
There are very important job selection criteria’s available in ‘extended job selection’ tab. You can visit it, everything is self-explanatory no need to mention here.
Press F8 to search job for given selection criteria.
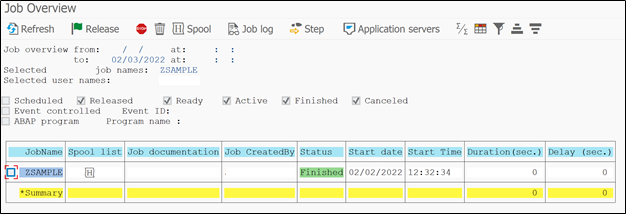
So our job is in finished stage. You can also notice the start date and time plus duration of how long job was running.
Further in menu, we have option of Job log, where we can get the details of step job performed. Job logs are useful when job fails. Like in our example we have executed depreciation run program. So if the depreciation run got failed due to not maintenance of document number ranges or due to cost center block issue then these details will be printed in job log to analyze and take corrective actions.
In spool the result screen is printed with the information that are requested through program. If you are running reports in background, then report result will be available in spool. In our depreciation case, in spool we can see the assets with posted depreciation values.
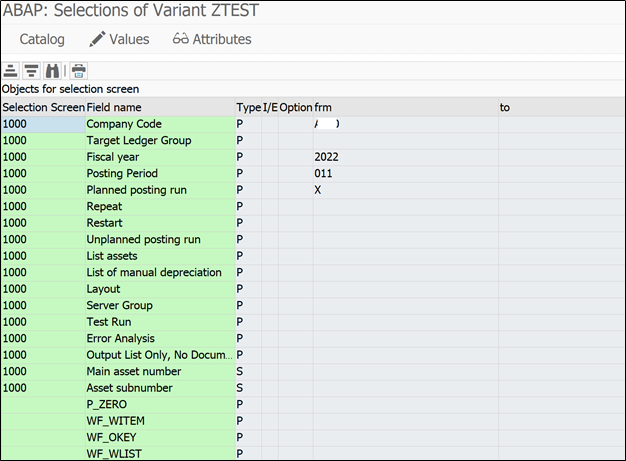
Next we have ‘Steps’ option where we will get to know the underling programs of job. There we can also see the program variant that is executed for selected job.
This is the program running under ZSAMPLE job. If you want to check variant values then go to Menu – Goto – Variant
Here you can confirm for which company code and for which FY, period this job was scheduled/run.
Here you have multiple option to know more about job.
On top right hand side, Start condition will tell you what triggered this job.
‘Job details’ will help you understand, job priority and execution server details.
‘Predecessor job’ option will tell you what are the job that run before this job and after completion that job will trigger this job.
‘Successor Job’ will tell you which job will be triggered after this job is completed. These two options are very useful to know more about dependent jobs.
Our ZSAMPLE was standalone job. It neither get triggered by any job nor it triggers another job.
This is all about job monitoring and job schedule. You can bookmark this post for future reference.
Thanks for reading. Do subscribe to our newsletter below to receive notification of new blogpost.
If you enjoy the blogpost, then you can stay connected with us on below platforms:
Many connections asked us for best resources or books to learn SAP. So we decided to start with SAP ABAP and find out what are the best resources to learn SAP ABAP.
While writing this blogpost I wondered, how people spend thousands of dollars in SAP Certified classes just to scratch the module little bit, while there is so much knowledge packed content available on internet for literally few bucks.
We talked with many experienced consultants about how they learn ABAP apart from initial entry level courses/classes. And this blogpost is the result of the answers we got. In this blogpost we have curated list of top 10 books to learn SAP ABAP.
Someone aspires to be a Techno Functional consultant should must read this book. Someone starting in SAP as a ABAP consultant must give a read to this book as it will help clear basic concepts. It will further help oneself in understanding complex level topics.
Below are the points discussed in the book:
• Taking your first steps. • Create ABAP Dictionary Tables and Objects • Create programs in a flash with the ABAP Editor • Define variables for calculations • Create and modifying character strings • Learn to debug your programs • Perform calculations with quantities, currencies, date, and time fields • Learn Open-SQL • Create program flow control and logical expressions • Build selection screens • Manage and modify internal tables • Modularization and programs
This will help you to build SAP HANA optimized ABAP applications. If one want to learn how ABAP programming is changed in HANA, then you can definitely give this book try.
“One glance at a book and you hear the voice of another person, perhaps someone dead for 1,000 years. To read is to voyage through time.” – Carl Sagan
This quote tells us that how we can learn from others, people who put decades of hard work into pages of book. And by just reading these books if you can gain the years of knowledge then why not read as much as possible.
This book dive little deeper into ABAP. it will teach you right approach of debugging, how to use SAP data dictionary in right way, expert ABAP development techniques.
This is one video course from Udemy. We don’t find video formats good source of learning for life long knowledge, because there are several reasons like if you watch something in video that time you literally see things happening and you left with zero interest doing it again. Very rarely you will rewatch any video. When in need it is hard to find right topic to watch again.
On the other hand, when you read books it urges you to follow them in system. It is easy to carry and refer at any point of time in any device. When you stuck anywhere, you know where to look into book. Usually books are referred again and again and it truly helps you absorbing the knowledge. Anyway, still we found this course useful and below are the things you will learn:
As mentioned in the course name this is for beginners.
How to write & modify ABAP program
Learn to build Reports, Interfaces, Includes, Forms, FM etc.
Now this is the need of hour for every ABAP Consultant to learn few things about SAP UI5. This book will help you understand UI5 from basic (Hello world, example) to advance (deep dive).
No matter how advanced APIs are nowadays. But one thing is clear that IDOCs are not going anywhere in near time. one of the most convincing evidence is, IDOC is still most searched term on google, related to SAP. So you can understand how extensively IDOCs are used across modules. No matter in which module or area of SAP you are working, you will always be in touch with IDOCs (this was the response from most of the consultants we talked to).
This book will help you to get started with IDOC. It will touch every aspect of IDOC that you should know. It will make you enough knowledgeable to handle IDOC issues or to build IDOC based interfaces.
What will you learn:
Fundamentals of Inbound & Outbound IDOC interfaces and configuration
Learn how to build interface with ALE & EDI
Troubleshoot common post implementation challenges
Quick reference guide to common IDOC transaction codes and reports
As name suggest this book is for Associate consultant, who already spend some years in writing ABAP programs. This book will introduce you to the latest ABAP techniques using practical examples. Tools available for import data from and to different environments, tools for manipulating XML, building stunning UI5 interfaces.
What you will learn:
Create stable and error-free ABAP programs
Leverage new ABAP concepts including object-oriented programming(OOP) and Model-View-Controller (MVC)
Learn to add custom code to your existing SAP program
Speed up your ABAP programs by spotting bottlenecks
Understand techniques such as performance tuning and optimization
Develop modern and beautiful user interfaces (UIs) in an ABAP environment
we don’t have too much material available so far to learn ABAP for cloud. This books stands out if someone wants to deep dive into ABAP in Cloud. You will find out how ABAP is changed in cloud. End to end guide to build SAP FIORI Apps. How to connect on-premise and cloud systems with external APIs.
The way ahead is S4 and so every ABAPer has to align and upskill thyself to new functions of S4. This book will bring you upto the speed it will introduce you to new ABAP functionalities like ODATA, BOPF, Core data Services. It will teach you to build new applications on S4.
So these are 10 (+1 bonus) books/resources we found must read for every Consultant who wants to have enrich career in SAP ABAP Module. All of this material is so cheap compared to the value they are providing. What you can learn reading even one book can be equivalent to years of work, if you try to learn these things on your own.
We often find that people will blow off money buying meaning less stuff but feel guilty to invest in learning. Many will run out of date skills and compromise on pay checks, but never try to learn new cutting edge skills.
There are many innovations happening every day, each passing day making hundreds of old technologies, software making out of date. We cannot be doing everything or track all the changes and that’s where books help us to catch up the speed.
Let’s end this post with the quote of Jeanette Winterson
“Books and doors are the same thing. You open them, and you go through into another world.”
Subscribe to our newsletter to receive weekly blogpost update.
If you enjoy the blogpost, then you can stay connected with us on below platforms:
We know that substitution and validation rules are used to validate and substitute data from master data & transactional data in SAP Finance Module. It is widely used in across sub-modules as it gives more flexibility to functional consultant further to end users via set maintenance.
I am presuming that you already know about substitution & validation rules, if not you can learn through these slides to understand basics of validation & substitution rules.
Steps in validation & substitution rule:
Validation–
Prerequisite
Check
Message
Substitution –
Prerequisite
Substitute
We can easily understand the function of both rules with below diagram:
We have option to put user exit in check step of validation and substitute step of substitution
So prerequisite remains open for use in both cases, so once the prerequisite rules are being match then only user exit will trigger to make changes (substitution) or to decide whether error msg should be displayed or not (validation)
Validation & Substitution rule transaction codes
You can remember transaction codes in below sequence
GGB0 – Validation rule creation
GGB1 – Substitution rule creation
GGB4 – Assignment of Validation & Substitution rules
These three transactions you all need for validation & substitution rules.
How to check user exit in validation/substitution
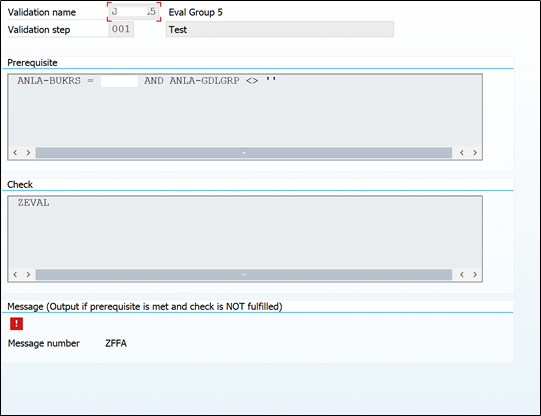
Let’s go to GGB0
GGB0 – Transaction code
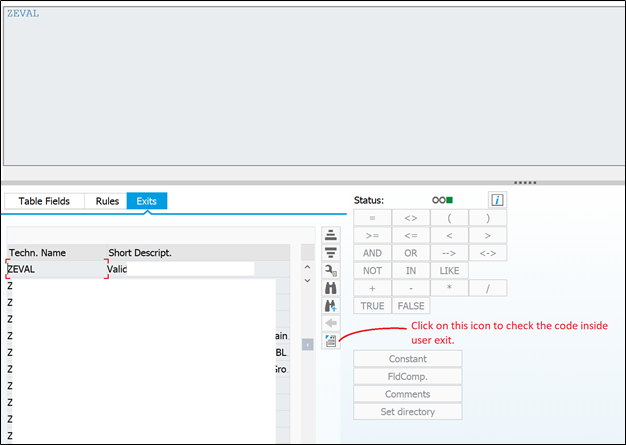
This is one validation rule, where in check step, user exit ZEVAL is used.
By clicking on check, you can go inside check condition:
GGB0 – Transaction code
Select the user exit and click on ABAP Routine (as mentioned above)
And you will be redirected to the section code for this user exit.
Here you can setup breakpoint, to debug the errors or to find out how user exit is working.
But this should be somewhere assigned, for system to know which program to check for user exit. And that we will see now.
How to create user exit for substitution and validation in SAP FICO?
In GGB0/GGB1 transactions, we have predefined list of user exit to select from. But that should be created somewhere, right?
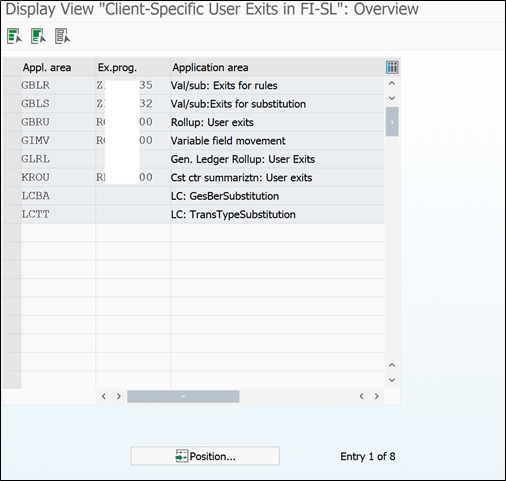
Go to transaction GCX2
GCX2 – Trasaction Code
In this transaction code GCX2, you have to assign GBLR (Validation) & GBLS (substitution) Application area to z programs in which ABAPer will be writing code for all user exits.
To create z program, you can copy standard program RGGBR000
ABAP team will write user exit name in subroutine ‘GET_EXIT_TITLES’,
Under user exit code will be written as per the specification / requirements.
So in our example we used user exit ZEVAL. This name will be written in program assigned above in (GCX2). In this program there will be blocks of code for multiple user exits. In our case system will only run the program block of code written for ZEVAL user exit.
This is how user exit is link to program and it is used in substitution and validation rules.
This brings us to an end. Hope you enjoy and learn something. We publish such blogs once in every week, if you want to get notified of new blogposts, then you can register to below newsletter:
You can also stay connected with us on below platforms: